


-

Kamakshi S
15th May 2013
Photography is all about lights and hues. As you relax on your much-awaited vacation at a picturesque location, it is a good idea to give your camera an airing. And while you're at it, it’s a nice idea to try out a few new tricks. While I have stuck to an entry-level DSLR (Canon 550D, with an 18-55mm kit, and 50 mm fixed focal length lenses), you can use any camera that lets you tinker around with settings such as ISO values, shutter speeds / exposure value (EV), aperture, and focus. Here are some simple ones you can start off with:
Bokeh
While well-focused shots give you the best depth of field; bokeh images form the other end of the spectrum. For those who wish to understand technicalities, when clicking the sharpest of images, the camera only concentrates on the object in focus, which results in a blurred (or hazy) background. When you focuses on one particular subject, it results in what is popularly referred to as depth of field. So by that logic, the sharper the object in focus, the deeper the depth of field.
When the foreground object is in sharp focus, the background gives you a glimpse of bokeh.
Aperture: f/1.8, Shutter Speed: 1/1600 sec, ISO: 400; Shot in the Aperture Mode.
So when you decide to blur out your object in focus, what you end up with is a bokeh shot. Bokeh works best with lights. The object in focus is ideally blurred out, with soft edges. That being said, you will not end up with a clean bokeh shot with a standard camera lens, simply because most lenses are built to give you the sharpest of focus, and ignore shots with lack of it. So even though you do end up with a bokeh, it isn't a text-book shot as the edges of the resulting pictures are sharp, not soft. But there is little you can do about it. That being said, just make sure to keep the f-stop (aperture opening) value as low as possible: The lower the number, the wider will be the resulting shapes. Also, since most bokeh shots are taken at night, the ISO value will ideally be in excess of 800, but ensure that the shutter speeds are as high as possible.

A well-lit night scene is perfect to experiment with bokeh shots.
Aperture: f/5.6, Shutter Speed: 1/15 sec, ISO: 1600, Shot in the Aperture Mode.
To capture bokeh shots, you need a camera that lets you shoot with a manual focus. Switch to manual focus, and point at a source of light. Set the focus directly on a source of light (like a candle, or a bulb) in such a way that light falling on sensor is the softest, and capture the scene.

Traffic lights often are a very interesting place to try bokehs.
Aperture: f/5.6, Shutter Speed: 1/20 sec, ISO: 1600, Shot in the Aperture Mode.
Although your end result may not be a typical bokeh, it's worth giving the technique a whirl. After all, if you are enjoying the night lights in a city, low-light shots can be quite frustrating to get right. Some memories are better than none at all!
Silhouette
Good lighting is probably the most important aspect of getting the best of pictures and most decent cameras are equipped to take nice pictures in ideal, well-lit conditions. But this interesting trick lets you play around with light in such a way that you can capture some thought-provoking shots. To get good silhouettes, you need a camera that lets you tinker around with your aperture (F-stop value), ISO, and shutter speed (exposure time). For a detailed guide to take silhouette shots, refer our older story here.
For sharp silhouettes, ensure your camera is pointing at the light-source directly.
Aperture: f/13, Shutter Speed: 1/13 sec, ISO: 200, Shot in the Aperture Mode.
HDRI
HDR or High-dynamic-range photographs are created using multiple photographs of the same scene with different exposure bracketing (EV), after which they are fused into a single HDR image. While you can use JPEG images to create HDR shots (several cameras including those on mobile phones let you process HDRs within the device), it is advisable to use the camera's raw image format, because a lossy format like JPEG will not really offer well-detailed images. That also effectively means it is better to process these images using an application on a PC.
Top: Final HDRI; Bottom Row: Bracketted shots with EV set to -1, 0, and +1.
To begin with, snap three images with three distinct Exposure values (-1, 0, and +1 works best). Several DSLRs come with auto bracketing options, which means that once your settings are in place, all you need to do is take three continues shots of the same scene. Once done, load them in a free application such as Luminance HDR and go with your creative instincts. If you are looking for some more effects and tweaks to play around with your HRD shots, investing in the Photomatix Pro will be well worth your time. Although the application is priced at a steep $100 (approx Rs 5500), it's a software worth investing in. You can use a trial version to get a hang of it before making a purchase though.
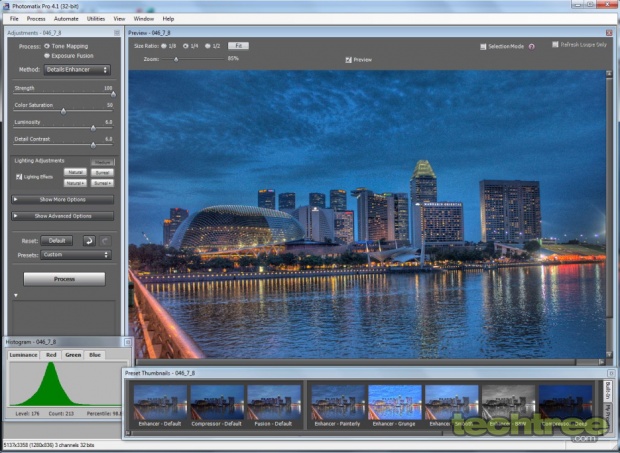
Editing bracketted shots in Photomatix Pro.
Monochrome
While some people love the camera, there are enough who don’t prefer posing for shots as well. If you are looking at taking some candid portrait shots that everybody agrees upon, then the monochrome (also known as grayscale, black and white, or monotone) effect can be an interesting effect to try.
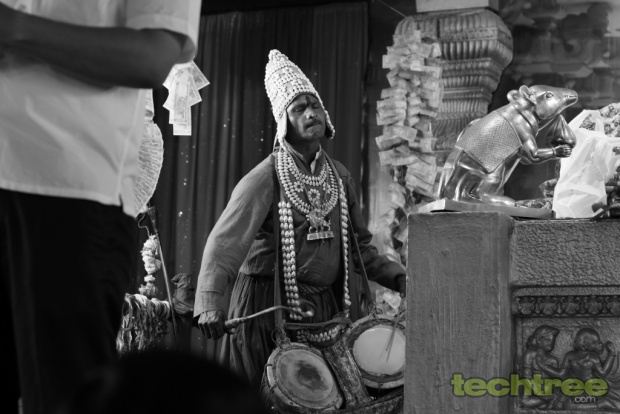
Since most facial blemishes automatically get hidden in the greyscale, it's perfect for portraits.
Aperture: f/2.8, Shutter Speed: 1/60 sec, ISO: 400, Shot in the Aperture Mode.
And considering that photography is all about lights and colours, stripping your pictures off both brings out details in your shots. You can try the effect on landscapes as well, to capture shots that add an essence of nostalgia.

A quiet, enchanting side of the usually bustling Mumbai city.
Aperture: f/3.5, Shutter Speed: 1/2500 sec, ISO: 200, Shot in the Aperture Mode.
Just set your camera to the required mode and get stunning monochromes right from your device. That being said, keep an eye out on the EV and white balance values. You are likely to end up with overexposed (washed out) monochrome shots if you aren’t careful.
Setting the light meter (EV) right can help you capture interesting monochrome shots.
Aperture: f/3.2, Shutter Speed: 1/125 sec, ISO: 200, Shot in the Aperture Mode.
If you aren’t too comfortable experimenting with the settings on your snapper, then you can post-process images to desaturate their colours using pro-tools such as Adobe Photoshop, Lightroom, or free applications such as IrfanView and Picasa.
Panorama
Unlike HDR images though, the chances of you getting a better composed panorama from your smart device is better these days. For it to work though, you would require very steady hands and a lot of patience to get such shots right. Personally, I am not a big fan of 360-degree panoramas, or fish-eye styled images (as you get with apps such as Photosynth). So I prefer taking pictures from my camera and using a stitching tool on my PC to composite panorama images.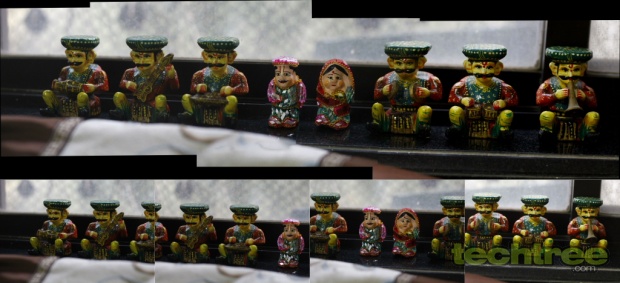
Top: Composite panorama; Bottom Row: Four individual shots that make up the picture.
One of the best tools to stitch images is the Microsoft ICE. I tried to stitch images that weren’t closely overlapping, and the software managed to make the image appear seamless. To stitch images, just load the images into the application and set the Camera motion option to Automatic. If you prefer the images in a circular motion, you can set the value to Rotating Motion instead. Set the quality to 100, and once ready, just click the Export to disc… button and you have you perfect panorama ready. But one thing you’ll have to keep in mind, it doesn’t process your image to make its lighting uniform, you’ll have to depend on tools such as Photoshop or Lightroom to set that right.
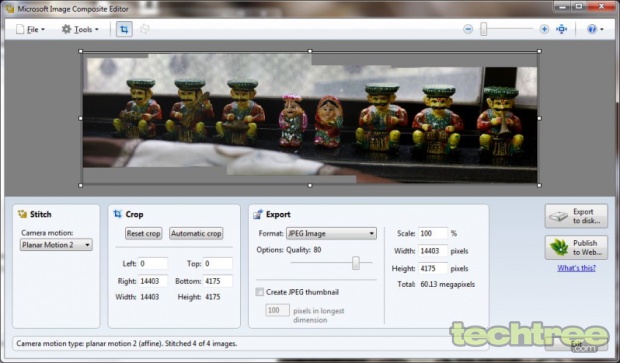
Creating panoramas with Microsoft ICE.While these were some basic effects that you can try with your snapper, you can improvise to add more character to your shots. So are you ready to have more fun with your camera now?
Guide: Five Interesting Photo Tricks To Try Out | TechTree.com
Guide: Five Interesting Photo Tricks To Try Out
Explore the true potential of your camera with these neat tweaks.
News Corner
- DRIFE Begins Operations in Namma Bengaluru
- Sevenaire launches ‘NEPTUNE’ – 24W Portable Speaker with RGB LED Lights
- Inbase launches ‘Urban Q1 Pro’ TWS Earbuds with Smart Touch control in India
- Airtel announces Rs 6000 cashback on purchase of smartphones from leading brands
- 78% of Indians are saving to spend during the festive season and 72% will splurge on gadgets & electronics
- 5 Tips For Buying A TV This Festive Season
- Facebook launches its largest creator education program in India
- 5 educational tech toys for young and aspiring engineers
- Mid-range smartphones emerge as customer favourites this festive season, reveals Amazon survey
- COLORFUL Launches Onebot M24A1 AIO PC for Professionals
TECHTREE